HOW DO YOU DO THAT?

Friday, December 20, 2013

PATTERN REVIEW OF
COLETTE'S LAUREL DRESS!


Posted on PatternReview.com on December 20, 2013

Miss Gwen here, seamstress and class teacher at Selvedge Studio!

Pattern Description: A chic and simple shift dress with minimal dart shaping. Perfect for any season, as the variations are endless. I chose to make Version 2.

Pattern Sizing: Cut pattern at a size 6 (standard store demo size that we make for Colette patterns.)

Did it look like the photo/drawing on the pattern envelope once you were done sewing with it? Yes, indeed!

Were the instructions easy to follow? Since I was making this as a trial pattern to determine if it is suitable to teach for our Beginning Series Class, I wanted to see if I could make the dress without looking at the directions. If it could be done easily and in a reasonable amount of time, then I would consider teaching it as a class. Only after completion did I look at the directions, and found that I only replaced a few things: staystitching the neckline (replaced with serging the edges of all pieces), sewing the bias tape onto the sleeve cuffs and then sewing the underarm seam (I sewed the seam first, and then the bias tape) and handstitching the bias tape down on the inside (I topstitched it down instead.)

Looking back at the directions, they are incredibly informative and complete, and anyone who is looking for a pattern with good visuals, tips, and definitions would be well of with this pattern (and most other Colette patterns for that matter.) As for suitability for a class, it will work just as well with a few of the time-saving methods that I used.


What did you particularly like or dislike about the pattern? All Colette patterns have great visual descriptions, and the Laurel is no different. I especially like the basic checklist at the beginning of the directions, which provides a good breakup of the overall process of building a dress. The only things I would add/change in the directions would be including a note on laying out the pattern pieces on directional fabric (which I used), since this is a pattern for Beginners and it may not be something realized until the dress is almost finished. Secondly, I would change the directions for the bias tape application on the sleeves and neckline to include how to finish with a machine rather than by hand, as I know many people may either despise hand sewing or not be as comfortable with it as they are on a machine.
Fabric Used: 100% mid-weight cotton. Dress is Anna Maria Horner's Twill Bouquet (Dowry line) and the contrast is Moda's Bella Solids color 266.

Pattern alterations or any design changes you made: Used 1/2" seam allowances, contrasting fabric for bias tape and pockets, made the hem straight instead of slightly curved.

Would you sew it again? Would you recommend it to others? This is the third Laurel project (V. 1&4 have been done by coworkers), so we obviously like it! It's a simple dress design with easy options for making it unique. I would recommend it to Intermediate-Beginning sewers and above.

Conclusion: The dress turned out great, and it was easy to put together. Very pleased, and we are planning on teaching the class in January 2014!


See the full review at patternreview.com!

Friday, July 26, 2013

Saturday, June 22, 2013

FARM SHARE BAG::

Here's how it happened:  Thursday is farm share pick-up day.  And the veggies don't come in grocery bags from the farm so...

I found inspiration hiding under this table in a West Elm catalog.

(And I've being trying to think a(nother) great use for this beautiful 18" wide linen.)

Step 1::  Decide what size you want your bag.  I made mine HUGE and cut my pieces accordingly.  The finished bag is about 17" x 17" with an 8" bottom panel. 
I cut:  3 pieces 20" long (for the sides) and one 9" piece (for the bottom panel). 
My fabric came 18" wide, but you could certainly trim down a wider fabric.

Step 2 :: Cut one of your 20" pieces in half, parallel to the selvage, to create the band for the skinnier sides of your bag.  They should be about 20" by 9"

Step 3 :: (Optional:  I serged all my raw ends to keep them from unraveling.)  Next, sew the 2 skinny side pieces you created in step 2 to either side of the bottom piece to create a long band, with the bottom panel in the middle.  Press your seams flat. 

Step 3 :: Lay one of your larger (20") side panel pieces, right sides together, centered over the bottom panel of the bag, and pin if you wish.  Sew the side panel to the bottom panel of your bag, your project will look like a "T".   

Step 4 :: When you reach the seam on the band between your bottom and skinny side panels, pivot and sink your needle, lift the foot of your machine and shift the fabric so that the long side of large panel matches up with the long side of of your shorter panel.  Put your foot down and stitch.  Do the same thing to attach the other end of your side panels together.  Once you've sewn the first side panel to your side and bottom band - repeat step 3 and 4 for the other large side panel of the bag.   

Step 5 :: Press all your seams flat and press a nice big hem into the top of the bag - mine is about 3".  Top stitch your hem close to the raw edge so it lays flat. 

Step 6 :: I couldn't find a ribbon I liked that was large enough to fit the scale of this giant bag, so I zig-zag stitched 2 lengths of ribbon together.  Each strap ended up being about 30" so that I could fit the bag comfortably over my shoulder.  Press a hem into the raw ends of the strap to give a finished look and add to the stability at the spot where you stitch it to the bag. 


Step 5 :: Stitch your strap to your bag in a box shape for so it is nice and secure. 


Fill it with veg, or whatever. 


Friday, May 31, 2013

QUICK TABLECLOTH TUTORIAL to dress up your next party


You will need :: 2 yards of designer cotton fabric for the body & 1/2 yard contrast fabric (small pattern preferred: like polka dots) to make the bias tape.
STEP ONE ::  Make bias tape by cutting your fabric on the bias (a 45% angle from the selvage) in 2" strips, sew your strips end to end, use a handy bias tape tool (found at Selvedge Studio) to fold your strips , iron and wa-la!

STEP TWO ::  Sew the continuous length of bias tape around all 4 edges of your main piece of fabric and you've got a cute little tablecloth for your celebration - and you can use it again and again! 

Way more fun (and green) than paper -or worse, plastic! - store bought tablecloths!


Friday, May 10, 2013

The Patriot Dress! Kwiksew Pattern 3521
Intermediate Class Project, Starts May 24th.

Sunday, April 7, 2013

MISS WONG the process ::

A sweet and comfy reading nook, all created from one amazing painting as inspiration!
Here is our process:


"Miss Wong" was painted by Vladimir Tretchikoff in the 1950s.  We lucked out and found this print in a thrift store in Minnesota for $15.  We were instantly attracted to it, so we used it as a jumping off point for colors and textures.  


A mood board helped organize our vision


When it was time to go shopping - we found things we loved, but couldn't keep them all.  Here are some of the ones we passed up (for lots of reasons like: price, scale, color, and mood).

Once we had collected all the perfect pieces from things we already had around, and things we bought (including goodies from booth 57 at The Montana Antique Mall, and fabric from Selvedge Studio) it was time to do some sewing. 


An easy sewing project for a beginning seamstress, that makes a big impact, is a simple envelope pillow (check out our tutorial for step by step instructions). 


For an intermediate seamstress, recovering the cushions on a vintage chair can be rewarding and save you a bundle (check out our tutorial if you want to see how we did it). 


We had the curtains sewn by a local seamstress (thanks Lori), but curtains are also an easy DIY project for a quick fix (here is a tutorial on the simplest kind of curtains).  And ta-da!!


Monday, April 1, 2013

HOW TO RECOVER A CHAIR::

find:: a chair with good bones that only needs a little TLC

collect all your supplies::i am reusing the pillow forms from the chair, and have chosen an amazing chartreuse wool to recover them with.  i am skipping the piping so upholstery zippers and some thread are the only other supplies i need.
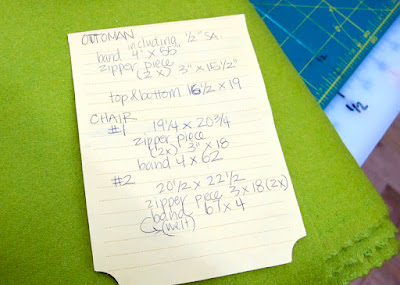
take careful measurements::  because these cushions are square there is a boxing band piece in addition to the top and bottom pieces.  i measured the band in 3 pieces, one long piece that goes around 3 sides of the pillow, and 2 shorter pieces in the back (one piece above the zipper and one below, creating a zipper panel).

cut out your pieces::

sew:: first,  sew the zipper panel by stitching the zipper between the two smaller band pieces.  sew the long band piece to the pillow's top.  next, sew the zipper panel to the band, finishing the back of the band.  then stitch the zipper panel to the top piece.
finish::
now, sew the band to the pillow's bottom piece.  pull it right side out through the zipper opening and press the seams.
enjoy::

ENVELOPE PILLOW TUTORIAL::

20 minutes and 1/2 yard of fabric, I swear
Step 1::  get 1/2 yard of 45" fabric at your local fabric shop, picking the fabric will be the hardest part of this project

Step 2::  press a 1" hem into the short (18") sides of your fabric

Step 3::  stitch your hem 
Step 4::  next, fold in the hemmed edges (right sides together), overlap your fabric to create an 18" length (you'll have an 18" square).  press

Step 5::  finally, stitch the 2 open edges closed.  pull your fabric right side out through the "envelope" opening and fill it with a pillow form.

ta da!  easy to sew, easy to clean and easy to change